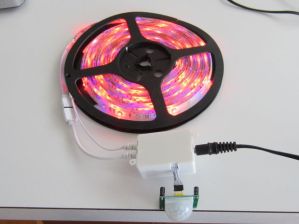
I find that the measure of a good Instructable is the ideas that it inspires, which is why I enjoyed Instructable titled "Give Your Bed Under glow!" I never would have thought of adding an LED strip to the bottom of a bed otherwise, and I immediately wanted to do this for my kids.
I wanted to go a bit beyond what did and add the ability to have the lights turn on when needed and off again after a period of inactivity, so I decided to try my hand at hacking the LED strip to do just that. This instructable will show you how I went about hacking my LED strip to add a microcontroller and motion sensor. Hopefully the ideas you find here will serve as a launching point for your own ideas and improvements..
(This step is a discussion of my approach to hacking the LED strip, and may not necessarily be well described. If you just want to get on with the instructions already, feel free to skip to the next step.)
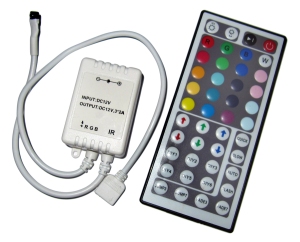
The LED strip I purchased (found here: http://www.newstarleds.com/products-177.html) came with an LED controller and remote control, which I think is quite common.
The idea is to be able to add a microcontroller that can control the power to the LED strip (turn it on and off as needed), without losing the ability to control the color and pattern with the remote control. There were two options, as I saw it:
Build an entirely new control circuit.
This would require integrating the remote control receiver into the new microcontroller, reverse engineering the remote protocol, adding MOSFETs to control power to each of the LED channels (and, probably, a MOSFET control chip), and programming the light values and patterns into the microcontroller.
However, that's quite a lot of work and a lot of additional electronic components. To be honest, and let's be clear about this, I'm far, far too lazy to do all that work, which leaves option number...
Wire the microcontroller into the existing circuitry.
Wire the microcontroller into the existing circuitry.
This is the approach I took for this Instructable. and will be described below.
Somehow the circuit needs to be modified to allow the microcontroller to control the power supplied to the logic portion of the LED controller circuit board.
Somehow the circuit needs to be modified to allow the microcontroller to control the power supplied to the logic portion of the LED controller circuit board.
A quick look at the LED controller circuit board shows that there are two black ICs. The upper IC in the pictures is the brains of the controller. It changes the LED color, does pulse-width modulation (PWM), and controls the light patterns. I'm guessing that the lower IC is a MOSFET control chip, which turns power on and off to each of the LED power lines (I could be wrong about this, however). There's also a ground plane (highlighted red in the third picture), a +12 volt power rail, and a +4.7 volt power rail (highlighted in blue). There are several potential solder points (highlighted in yellow).
The LED controller accepts commands from the remote control, allowing the LED colors to be set and for different display patterns to be selected. The controller is able to remember the LED settings when power is removed and reapplied, which will be very helpful.
I measured the current being drawn by the two ICs at about 1 mA, which is well within the current sourcing abilities of most microcontrollers, so a transistor or MOSFET will not be needed and the ICs can be powered directly from the microprocessor. All that is required, then, is to disconnect the two ICs from the +4.7 volt power rail (by cutting the circuit board trace at the black line), tie the microcontroller to +4.7 volts and ground, and connect one of the microcontroller pins to the power pins of the two ICs on the LED controller circuit, so that the microcontroller can power the ICs at will.
A simple and cheap PIR motion sensor can be easily connected to the microcontroller to detect motion, and the microcontroller can easily be programmed to timeout after a specific period of time.
Seems simple enough!


没有评论:
发表评论